MARKSMANSHIP TRAINING
Marksmanship training is conducted in three phases. Section I of this chapter discusses the first phase, preliminary marksmanship training (nonfiring individual skill proficiency). Section II discusses the second, phase, basic gunnery, during which the soldier learns to apply the fundamentals of gunnery and to zero the M203 during qualification exercises in day, NBC, and night conditions. The third phase, advanced gunnery, is discussed in Chapter 6. Every phase has the same three objectives: to teach each grenadier to hit the target accurately with the first round, to adjust fire, and to do both quickly.
| WARNING |
|---|
BEFORE ALLOWING ANYONE TO MOVE BETWEEN STATIONS, ENSURE THAT ALL RIFLES AND GRENADE LAUNCHERS HAVE BEEN CLEARED, THAT BOLTS REMAIN TO THE REAR, AND THAT BARREL ASSEMBLIES REMAIN IN THE OPEN POSITION. ANYONE OBSERVING AN UNSAFE ACT SHOULD CALL "CEASE FIRE" AND NOTIFY RANGE PERSONNEL IMMEDIATELY. |
Section I. PRELIMINARY MARKSMANSHIP TRAINING
Grenadiers and leaders must master marksmanship fundamentals before firing individually or collectively. During preliminary marksmanship training, grenadiers learn and demonstrate the individual skills that prepare them to fire live ammunition. After learning the characteristics and mechanics of the weapon (Chapters 2, 3, and 4), they learn the four fundamentals of marksmanship. These are followed by sight manipulation and response to fire commands. Dry-fire exercises are excellent for training to proficiency. Good preliminary marksmanship instruction (PMI) improves individual proficiency, which in turn improves the proficiency of collective fire.
5-1. FOUR FUNDAMENTALS OF MARKSMANSHIP
The four fundamentals of M203 marksmanship are steady position, aiming,
breathing, and trigger control. When the soldier changes his position, only
the first fundamental (steady position) varies. The other three remain the
same.
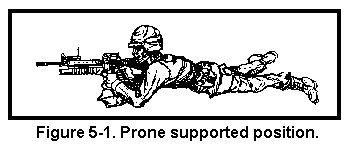
a. Steady Position. This varies according to the position.
(b) Lower your right elbow to the ground so your shoulders are level. This places the weight of your body behind the weapon, which enables you to recover quickly each time you fire.
(c) Grasp the rifle magazine with your left hand. Straighten your upper body, and spread your legs a comfortable distance apart. Try to point your toes outward and relax your ankles, so your heels will rest on the ground. Relax the weight of your upper body forward onto your left arm.
(d) For ranges greater than 150 meters, lower the buttstock of the weapon to obtain the proper sight alignment and sight picture. Grip firmly to prevent this from moving the weapon from your shoulder pocket.
| WARNING |
|---|
BEFORE FIRING. |

(b) Place your left foot about .45 meter (18 inches) to your left front, with your toes pointing in the general direction of the target.
(c) Keeping your right toe in place, sit on your right heel.
(d) Place your left elbow forward of your left knee, resting the flat portion of your upper arm on your knee.
(e) Move the rifle butt into the pocket of your right shoulder, pulling the rifle pistol grip with your right hand.
(f) With your left hand on the rifle magazine, place your left forefinger in the trigger guard of the grenade launcher.
(g) Pull the rifle firmly into your shoulder.
(h) Pull your right elbow in close to your body to help you apply rearward pressure to the weapon. Ensure that your leg completes a solid, three-point base for your position. For ranges greater than 150 meters, lower the buttstock of the weapon to obtain the proper sight alignment and sight picture. Grip firmly to prevent this from moving the weapon from your shoulder pocket.
(3) Sitting position, open-legged. Figure 5-3 shows the open-legged sitting position. To assume this position--

(b) Grasp the rifle magazine with your left hand and the pistol grip with your right hand.
(c) Bend forward from your hips, and rest your left upper arm against the inside of your left knee.
(d) Move the butt of the rifle into the pocket of your right shoulder, still holding the rifle pistol grip with your right hand.
(e) Rest your right elbow on the inside of your right knee.
(f) Pull the weapon down slightly with your left hand, and pull it to the rear firmly with your right hand.
(g) For ranges greater than 150 meters, lower the buttstock of the weapon to obtain the proper sight alignment and sight picture. Grip firmly to prevent this from moving the weapon from your shoulder pocket.
(4) Sitting position, cross-ankled. Figure 5-4 shows the cross-ankled sitting position. To assume this position--

(b) Extend your legs from your body, and cross your left ankle over your right ankle.
(c) Keep both ankles straight.
(d) Grasp the rifle magazine with your left hand and the rifle pistol grip with your right.
(e) Place your left upper arm across your left knee.
(f) Move the butt of the rifle into the pocket of your right shoulder.
(g) Lower your right elbow so that your upper right arm is in contact with your right knee.
(h) For ranges greater than 150 meters, lower the buttstock of the weapon to obtain the proper sight alignment and sight picture. Grip firmly to prevent this from moving the weapon from your shoulder pocket.
(5) Sitting position, cross-legged. Figure 5-5 shows the cross-legged sitting position. To assume this position--

(b) Cross your left leg over your right leg, and draw both feet close to your body.
(c) Grasp the rifle magazine with your left hand.
(d) Place your left upper arm against your left knee.
(e) Move the butt of the stock into the pocket of your right shoulder, and grasp the rifle pistol grip properly.
(f) Lower your right elbow so that your right upper arm is against your right knee.
(g) For ranges greater than 150 meters, lower the buttstock of the weapon to obtain the proper sight alignment and sight picture. Grip firmly to prevent this from moving the weapon from your shoulder pocket.
(6) Squatting position. Figure 5-6 shows the squatting position.
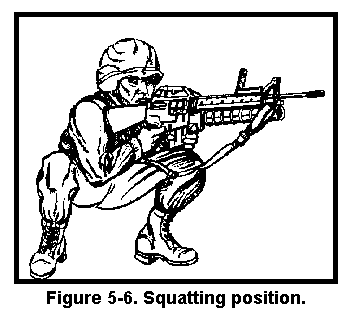
(b) Grasp the rifle magazine with your left hand.
(c) Place your left upper arm inside your left knee and the butt of the stock into the pocket of your right shoulder, then grasp the rifle pistol grip properly.
(d) Lower your right elbow against the inside of your right knee.
(e) For ranges greater than 150 meters, lower the buttstock of the weapon to achieve proper sight alignment and sight picture. Grip firmly to prevent this from moving the weapon from your shoulder pocket.
(7) Fighting position. If you fire from a fighting position, try to use support (Figure 5-7).
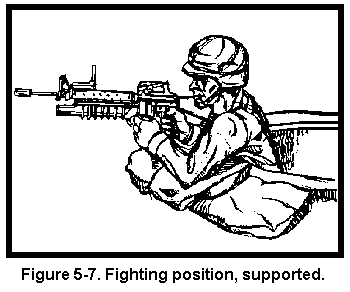
(b) Grasp the magazine with your left hand.
(c) Place your left elbow on or against solid support.
(d) Use your right hand to position the butt of the stock in the pocket of your right shoulder, then grasp the rifle pistol grip properly.
(e) Place your right elbow on or against a solid support, and relax into a comfortable firing position.
(f) For ranges greater than 150 meters, lower the buttstock of the weapon to achieve proper sight alignment and sight picture. Grip firmly to prevent this from moving the weapon from your shoulder pocket.
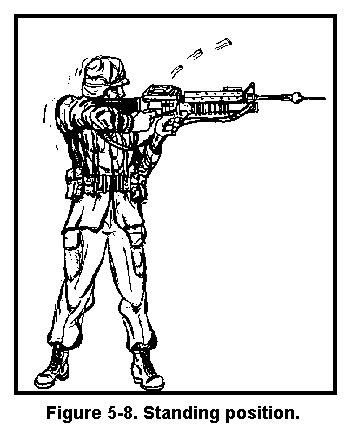
(b) Grasp the rifle pistol grip with your right hand and the rifle magazine with your left hand. Then place the butt of the stock into your right shoulder so that the sight is level with your eyes.
(c) Hold your right elbow high to form a good pocket for the butt of the stock and to permit a strong rearward pressure with your right hand.
(d) Hold most of the weight of the weapon with your left hand.
(e) Shift your feet until you achieve a natural aiming stance.
(f) For ranges greater than 150 meters, lower the buttstock of the weapon to obtain the proper sight alignment and sight picture. Grip firmly to prevent this from moving the weapon from your shoulder pocket.
b. Aiming. Aiming procedures for every position are as follows:

(3) Obtaining sight picture. To achieve a correct sight picture, align the front sight post and leaf sight or rear sight aperture with the target. For area targets, aim where the round's bursting radius will make the round most effective. For point targets, aim at the target's center of mass.
c. Breathing. The technique for breathing is the same for every position: Breathe naturally. Exhale most of your air, hold your breath, and fire before you become uncomfortable. In combat, just choke off your breath before firing.
d. Trigger Control. The technique for trigger control is the same for every position. Place your trigger finger (the index finger of your left hand), between the first joint and the tip of your finger (not at the extreme end of your finger) on the trigger. Adjust for your hand size and grip. Then, squeeze your trigger finger to the rear without disturbing the lay of the weapon.
The fundamentals of marksmanship are almost the same in limited visibility as in normal visibility. The best field-expedient method for firing the M203 grenade launcher is the marked-sling method.
a. Steady Position. An M203 with an AN/PVS-4 mounted on it leans to the left. When assuming a steady position, the grenadier must apply more rearward pressure to compensate for the lean, then steady the weapon.
b. Aiming. The grenadier sights with the reticle of the AN/PVS-4 rather than with the M203's iron sights. Sighting this way requires him to change position, which breaks his stock weld and makes the weapon seem heavier.
c. Breathing. Though breathing itself is affected little by limited visibility, using night vision devices (NVDs) that magnify the field of view increases the effect of weapon movement caused by breathing.
d. Trigger Control. This is the same regardless of visibility conditions. The objective is to keep the weapon aligned with the target.
e. Night Vision Devices. The AN/PVS-7 is issued for use with the M203, whereas the AN/PVS-4 is normally issued for use with crew-served weapons. M203 gunners may qualify with either device. In a defensive position, the gunner identifies targets during daylight and constructs aiming or elevation stakes, or both. Because the AN/PVS-7 rear sight must be set to the far setting to sense rounds, the gunner cannot see both the M203 sights and the target at the same time. Therefore, stakes are more important with the AN/PVS-7 than with the AN/PVS-4. (On the rear sight of the M16A1, the far setting is "L." On the rear sight of the M16A2, the far setting is "02.")
f. Marked-Sling Method. To use this method, the grenadier must--
(2) Ensure the sling is taut and vertical between the front sling swivel and the boot. If not, the rounds will impact at a greater range than desired. To check this, tie one end of a string or thread to a weight, such as a cartridge case, and tie the other to the sling swivel. Let it hang freely, and align the edge of the sling with it to ensure the sling is vertical.
(3) Fire several rounds to determine the desired range.
(4) Where the sling is held to the ground by the foot, mark the sling with colored tape, paint, ink, or whatever is available. Mark the position of the buckles so that, if either is moved, the grenadier can return them to their original positions and be assured of constant range accuracy.
(5) If the sling gets wet, it may stretch or shrink, indirectly causing the rounds to impact closer or farther than desired.
The fundamentals of marksmanship remain valid in the NBC environment, but some modifications may be needed to accommodate the equipment.
a. Steady Position. Bulky NBC wear requires the grenadier to press the stock of the weapon more firmly into his shoulder pocket.
b. Aiming. This is affected little by NBC.
c. Breathing. Wearing the protective mask makes breathing more difficult. Grenadiers must try to breathe normally to avoid hyperventilating while firing.
d. Trigger Control. All soldiers must wear rubber gloves.
Standard fire commands are explained to grenadiers, then used during all gunnery training that follows. Trainers give the appropriate elements before each dry-fire or live-fire exercise. The grenadier performs as directed and repeats each element as it is announced. (Chapter 6 provides a detailed explanation of fire commands.)
a. Alert. The trainer gives the alert as a fire mission. On hearing this, the grenadier loads the weapon and moves the safety lever to FIRE.
b. Direction. The trainer gives the direction to target.
c. Description. The trainer describes the target, for example, "bunker" or "machine gun position," and the grenadier lays on the target.
d. Range. The trainer gives the (estimated) range to the target, for example, "150."
e. Method of Fire. The method of fire for either target is three rounds. On the basic range, grenadiers fire at both point and area targets.
f. Command to Open Fire. To open fire, the trainer commands COMMENCE FIRING or AT MY COMMAND. When ready, the grenadier announces "Up" and fires or waits for the command to fire. When all grenadiers are ready, the trainer gives the actual command to fire.
Dry-fire exercises train grenadiers in the techniques of loading, unloading, immediate action, fundamentals of marksmanship, and sight manipulation. These exercises are conducted with training practice (TP) or dummy rounds. The trainer gives fire commands as appropriate.
a. Loading and Unloading Exercise. This trains the grenadier to operate and clear the weapon proficiently. Loading and unloading procedures (Chapter 2) should be practiced with dummy ammunition.
b. Immediate Action Exercise. This exercise is conducted with a dummy round and the basic grenade launcher target.
(2) Maintain the sight picture while you pull the trigger to simulate firing.
(3) When you are informed that you have a misfire, apply misfire procedures, then continue to fire (Chapter 4).
c. Aiming Exercise. This exercise requires the grenadier to simulate firing a dummy round at a target on the basic grenade launcher range.
(2) If, after firing, you note that the sight picture has moved, then you were unsteady when you fired.
(3) After each shot, apply immediate action procedures to extract and eject the dummy cartridges. Then recock the barrel assembly.
(2) Windage. Depress the rear sight aperture left and right, and traverse the windage screw across the entire scale.
e. Dry-Fire Proficiency (Performance) Exam. Grenadiers practice the dry-fire tasks until they become proficient in operating the weapon; then they take the dry-fire proficiency exam (Appendix C). This exam emphasizes learning by doing. Before he can progress to live firing, each grenadier must demonstrate skill in every task in the exam.
f. Remedial Training. Soldiers who do not pass the performance exam must attend remedial training, after which they are retested. The soldiers who pass may help train those having difficulty.
5-6. SENSING AND ADJUSTMENT OF FIRE
The grenadier determines (senses) where the grenade landed relative to the target, then adjusts elevation and deflection.
a. Sensing. As soon as the grenade explodes, determine where it exploded with respect to the target. This is called "sensing" (the impact) and has two aspects: range and deviation. Because the casualty radius of the HE round is 5 meters (5 1/2 yards), determine both range and deviation to the nearest 5 meters.
(2) Deviation. Announce a deviation sensing as either--
b. Adjustment of Fire. To ensure a second-round hit, adjust your fire by sensing the impact of the round and manipulating the sight.
(2) If the grenade lands more than 25 meters over or short of the target, adjust the range quadrant to bring the next grenade on target.
(3) If the grenade explodes less than 25 meters from the target, adjust the point of aim to bring the next grenade on target.
(4) If the launcher is properly zeroed, deviation errors will be small, and you can easily correct them by adjusting the aiming point. However, a wind strong enough to move the grenade out of its normal trajectory will increase the size of the deviation errors. After observing the effect of the wind on the strike of the grenade, compensate for the effect of the wind by aiming into it. This should help bring the next grenade on target--for example, if the grenade bursts to the left and short of the target, sense the strike of the round relative to the target, then adjust an equivalent distance to the right and over the target to achieve a target hit. Watch the flight of the grenade to the target. This will help determine the effect of the wind on the grenade as it moves toward the target. Evaluating and compensating for the wind before firing increases your chances of achieving a first-round hit.
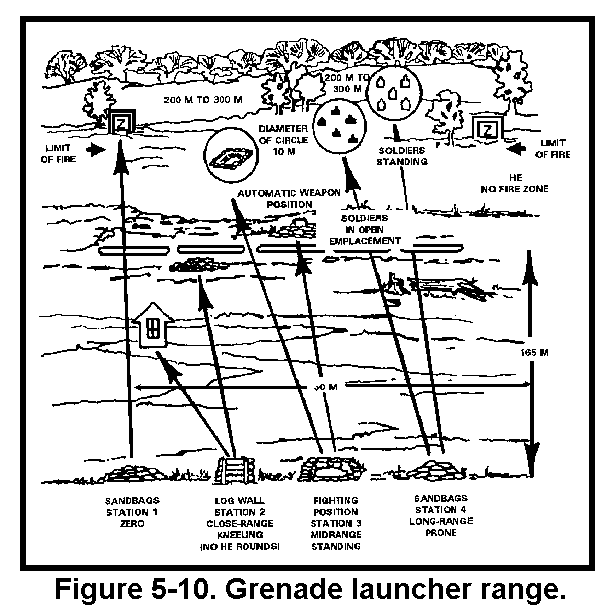
5-7. GRENADE LAUNCHER RANGE LAYOUT
The grenade launcher range is designed for all grenade launchers. Because soldiers can qualify on this range in all conditions, it prepares grenadiers for combat situations. The range has four stations. Figure 5-10 shows the range layout. Minimum range personnel and their duties are the same for M203 qualification firing as they are for other grenadier firing. These personnel include an OIC, NCOIC, safety officer, ammunition NCO, tower operator, station NCOs, primary trainer, and concurrent training trainers. Local policy may require more personnel. (Appendix D discusses range safety; FM 25-7 provides a detailed setup and target configuration for this range.)
5-8. DESCRIPTION OF RANGE AND TARGETS
The range has four self-contained stations. It is 30 meters wide by 500 meters deep, and has a no-HE fire zone out to 165 meters. (Grenadiers can fire HE only on Stations 1, 3, and 4.) Targets should be built from a durable material to reduce downrange target maintenance. Those within each station must be grouped and spaced so that the grenadier may fire on close-range, midrange, and long-range targets, in that order. The following description of the stations and targets is included to help trainers maintain control during zeroing, practice, and record fire:
a. Station 1 consists of a prone fighting position with a log or sandbag support and a zeroing target at 200 meters. The target should be constructed of logs or other suitable material. It must have a surface at least 2 meters high by 2 meters wide (6 feet by 6 feet). The target should be clearly marked with a large "Z" painted in a color that contrasts with the surrounding background, and that is visible in different sun or glare conditions.
b. Station 2 consists of an upright log or log wall, a kneeling firing position about 4 feet high, and two point-type targets. The targets include a simulated window or door of a building at 90 to 100 meters and a small bunker or fighting position, with overhead cover, at 125 meters. The targets may be constructed of logs, sandbags, or other suitable material.
c. Station 3 consists of a fighting position and two targets. The targets are a two-person bunker at 150 meters and an automatic weapon position at 175 meters. The bunker represents a point target, and the automatic weapon position represents a target that can be engaged with area-type fire. The targets may be constructed of logs, sandbags, or other suitable material.
FIGURE 5-10. GRENADE LAUNCHER RANGE.
d. Station 4 consists of a prone fighting position with a log or sandbag support and two area-type targets (with personnel targets in the open) at 250 and 350 meters. The log or sandbags at the firing position are used for support and cover. The targets are E-type (NSN 6920-00-795-1086) and F-type (NSN 6920-00-0714589) silhouettes.