2-1. PHASES OF TRAINING
Marksmanship training is divided into two phases: preparatory marksmanship training and range firing. Each phase may be divided into separate instructional steps. All marksmanship training must be progressive. Combat marksmanship techniques should be practiced after the basics have been mastered.
2-2. FUNDAMENTALS
The main use of the pistol or revolver is to engage an enemy at close range with quick, accurate fire. Accurate shooting results from knowing and correctly applying the elements of marksmanship. The elements of combat pistol or revolver marksmanship are:
2-3. GRIP
The weapon must become an extension of the hand and arm. It should replace the finger in pointing at an object. A firm, uniform grip must be applied to the weapon. A proper grip is one of the most important fundamentals of quick fire.
a. One-Hand Grip. Hold the weapon in the nonfiring hand; form a V with the thumb and forefinger of the strong hand (firing hand) (see Figure 2-1). Place the weapon in the V with the front and rear sights in line with the firing arm. Wrap the lower three fingers around the pistol grip, putting equal pressure with all three fingers to the rear. Allow the thumb of the firing hand to rest alongside the weapon without pressure. Grip the weapon tightly until the hand begins to tremble; relax until the trembling stops. At this point, the necessary pressure for a proper grip has been applied. Place the trigger finger on the trigger between the tip and second joint so that it can be squeezed to the rear. The trigger finger must work independently of the remaining fingers.
Figure 2-1. One-hand grip.
WARNING
IF THE NONFIRING THUMB IS PLACED IN THE REAR OF THE WEAPON THE RECOIL FROM THE WEAPON COULD RESULT IN PERSONAL INJURY.
Figure 2-2. Fist grip.
Figure 2-3. Palm-supported grip.
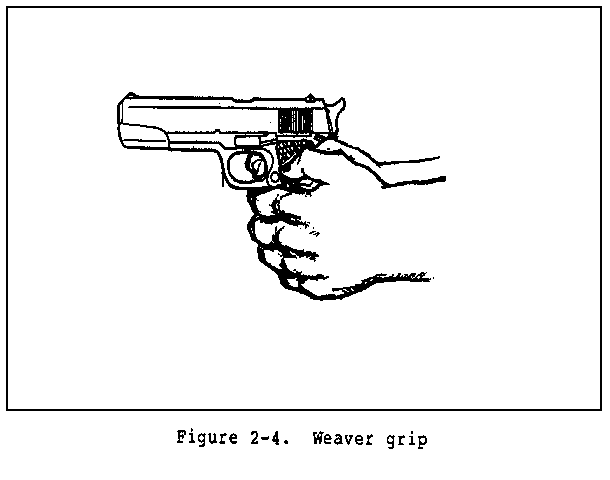
Figure 2-4. Weaver grip
c. Isometric Tension. The firer raises his arms to a firing position and applies isometric tension. This is commonly known as the push-pull method for maintaining weapon stability Isometric tension is when the firer applies forward pressure with the firing hand and pulls rearward with the nonfiring hand with equal pressure. This creates an isometric force but never so much to cause the firer to tremble. This steadies the weapon and reduces barrel rise from recoil. The supporting arm is bent with the elbow pulled downward. The firing arm is fully extended with the elbow and wrist locked. The firer must experiment to find the right amount of isometric tension to apply.
NOTE: The firing hand should exert the same pressure as the nonfiring hand. If it does not, a missed target could result.
d. Natural Point of Aim. The firer should check his grip for use of his natural point of aim. He grips the weapon and sights properly on a distant target. While maintaining his grip and stance, he closes his eyes for three to five seconds. He then opens his eyes and checks for proper sight picture. If the point of aim is disturbed, the firer adjusts his stance to compensate. If the sight alignment is disturbed, the firer adjusts his grip to compensate by removing the weapon from his hand and reapplying the grip. The firer repeats this process until the sight alignment and sight placement remain almost the same when he opens his eyes. This enables the firer to determine and use his natural point of aim once he has sufficiently practiced. This is the most relaxed position for holding and firing the weapon.
2-4. AIMING
a. Aiming is sight alignment and sight placement (see Figure 2-5). Sight alignment is the centering of the front blade in the rear sight notch. The top of the front sight is level with the top of the rear sight and is in correct alignment with the eye. For correct sight alignment, the firer must center the front sight in the rear sight. He raises or lowers the top of the front sight so it is level with the top of the rear sight.
b. Sight placement is the positioning of the weapon's sights in relation to the target as seen by the firer when he aims the weapon (see Figure 2-5). A correct sight picture consists of correct sight alignment with the front sight placed center mass of the target. The eye can focus on only one object at a time at different distances. Therefore the last focus of the eye is always on the front sight. When the front sight is seen clearly, the rear sight and target will appear hazy. Correct sight alignment can only be maintained through focusing on the front sight. The firer's bullet will hit the target even if the sight picture is partly off center but still remains on the target. Therefore, sight alignment is more important than sight placement. Since it is impossible to hold the weapon completely still, the firer must apply trigger squeeze and maintain correct sight alignment while the weapon is moving in and around the center of the target. This natural movement of the weapon is referred to as wobble area. The firer must strive to control the limits of the wobble area through proper breath control, trigger squeeze, positioning, and grip.
c. Sight alignment is essential for accuracy because of the short sight radius of the pistols and revolvers. For example, if a 1/10-inch error is made in aligning the front sight in the rear sight, the firer's bullet will miss the point of aim by about 15 inches at a range of 25 meters. The 1/10-inch error in sight alignment magnifies as the range increases--at 25 meters it is magnified 150 times.
Figure 2-5. Correct sight alignment and sight picture.
d. Focusing on the front sight while applying proper trigger squeeze will help the firer resist the urge to jerk the trigger and anticipate the actual moment the weapon will fire. Mastery of trigger squeeze and sight alignment requires practice. Trainers should use concurrent training stations or have fire ranges to enhance proficiency of marksmanship skills.
2-5. BREATH CONTROL
The firer must learn to hold his breath properly at any time during the breathing cycle if he wishes to attain accuracy that will serve him in combat. This must be done while aiming and squeezing the trigger. While the procedure is simple, it requires explanation, demonstration, and supervised practice. To hold the breath properly the firer takes a breath, lets it out, then inhales normally, lets a little out until comfortable, holds, and then fires. It is difficult to maintain a steady position keeping the front sight at a precise aiming point while breathing. Therefore, the firer should be taught to inhale, then exhale normally, and hold his breath at the moment of the natural respiratory pause (see Figure 2-6. ( Breath control, firing at a single target.) The shot must then be fired before he feels any discomfort from not breathing. When multiple targets are presented, the firer must learn to hold his breath at any part of the breathing cycle (see Figure 2-7). Breath control must be practiced during dry-fire exercises until it-becomes a natural part of the firing process.
Figure 2-7. Breath control, firing at timed or multiple targets.
2-6. TRIGGER SQUEEZE
a. Improper trigger squeeze causes more misses than any other step of preparatory marksmanship. Poor shooting is caused by the aim being disturbed before the bullet leaves the barrel of the weapon This is usually the result of the firer jerking the trigger or flinching. A slight off-center pressure of the trigger finger on the trigger can cause the weapon to move and disturb the firer's sight alignment. Flinching is an automatic human reflex caused by anticipating the recoil of the weapon. Jerking is an effort to fire the weapon at the precise time the sights align with the target.
NOTE: See problems in target engagement, paragraph 2-7.
b. Trigger squeeze is the independent movement of the trigger finger in applying increasing pressure on the trigger straight to the rear, without disturbing the sight alignment until the weapon fires. The trigger slack, or free play, is taken up first, and the squeeze is continued steadily until the hammer falls. If the trigger is squeezed properly, the firer will not know exactly when the hammer will fall; thus, he does not tend to flinch or heel, resulting in a bad shot. Novice firers must be trained to overcome the urge to anticipate recoil. Proper application of the fundamentals will lower this tendency.
c. To apply correct trigger squeeze, the trigger finger should contact the trigger between the tip of the finger to the second joint (without touching the weapon anywhere else). Where contact is made depends on the length of the firer's trigger finger. If pressure from the trigger finger is applied to the right side of the trigger or weapon, the strike of the bullet will be to the left. This is due to the normal hinge action of the fingers. When the fingers on the right hand are closed, as in gripping, they hinge or pivot to the left, thereby applying pressure to the left. (With left-handed firers, this action is to the right.) The firer must not apply pressure left or right but increase finger pressure straight to the rear Only the trigger Linger must perform this action. Dry-fire training improves a firer's ability to move the trigger finger straight to the rear without cramping or increasing pressure on the hand grip.
d. Follow-through is the continued effort of the firer to maintain sight alignment before, during, and after the round has fired. The firer must continue the rearward movement of the finger even after the round has been fired. Releasing the trigger too soon after the round has been fired results in an uncontrolled shot, causing a missed target.
NOTE: The trigger squeeze of the M9 pistol, when fired in the single-action mode, is 5.50 pounds; when fired in double-action mode, it is 12.33 pounds. The firer must be aware of the mode he is firing in. He must also practice squeezing the trigger in each mode to develop expertise in single-action and double-action target engagements.
2-7. TARGET ENGAGEMENT
To engage a single target, the firer applies the method discussed in paragraph 2-6 when multiple targets are engaged. The closest and most dangerous multiple target in combat is engaged first and should be fired at with two rounds. This is commonly referred to as a double tap. The firer then traverses and acquires the next target, aligns the sights in the center of mass, focuses on the front sight, applies trigger squeeze, and fires. The firer ensures his firing arm elbow and wrist are locked during all engagements. If the firer has missed the first target and has fired upon the second target, he shifts back to the first and engages it. Some problems in target engagement are as follows:
b. Trigger Jerk. Trigger jerk occurs when the soldier sees that he has acquired a good sight picture at center mass and "snaps" off a round before the good sight picture is lost. This may become a problem, especially when the soldier is learning to use a flash sight picture (see paragraph 2-9).
c. Heeling. Heeling is caused by a firer tightening the large muscle in the heel of the hand to keep from jerking the trigger. A firer who has had problems with jerking the trigger tries to correct the fault by tightening the bottom of the hand, which results in a heeled shot. Heeling causes the strike of the bullet to hit high on the firing hand side of the target. The firer can correct shooting errors by knowing and applying correct trigger squeeze.
2-8. POSITIONS
The qualification course is fired from a standing kneeling, or crouch position. All of the firing positions described below must be practiced so they become natural movements, during qualification and combat firing. Though these positions seem natural, practice sessions must be conducted to ensure the habitual attainment of correct firing positions. Assuming correct firing positions ensures that soldiers can quickly assume these positions without a conscious effort. Pistol marksmanship requires a soldier to rapidly apply all the fundamentals at dangerously close targets while under stress. Assuming a proper position to allow for a steady aim is critical to survival.
a. Pistol-Ready Position. In the pistol-ready position, hold the weapon in the one-hand grip. Hold the upper arm close to the body, and the forearm at about a 45� angle. Point the weapon toward target center as you move forward (see Figure 2-8).
Figure 2-8. Pistol-ready position.
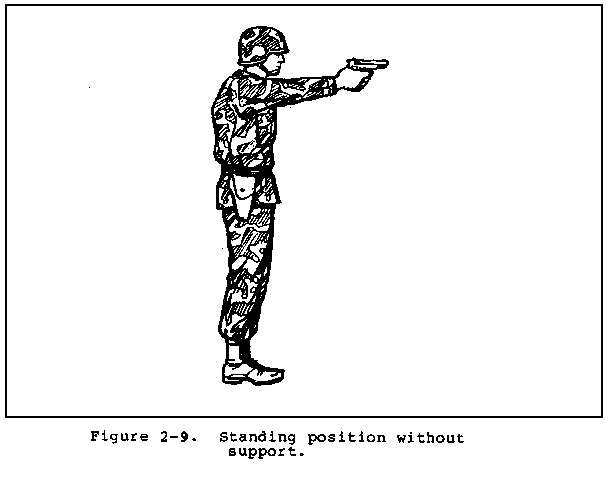
b. Standing Position Without Support. Face the target (see Figure 2-9). Place feet a comfortable distance apart, about shoulder width. Extend the firing arm and attain a two-hand grip. The wrist and elbow of the firing arm are locked and pointed toward target center. Keep the body straight with the shoulders slightly forward of the buttocks.
Figure 2-9. Standing position without support.
NOTE: During combat, there may not be time for a soldier to assume a position that will allow him to establish his natural point of aim. Firing from a covered position may require the soldier to adapt his shooting stance to available cover.
c. Kneeling Position. In the kneeling position, ground only the firing side knee as the main support (see Figure 2-10). Vertically place the foot, used as the main support, under the buttocks. Rest the body weight on the heel and toes. Rest the nonfiring arm just above the elbow on the knee not used as the main body support.
Use the two-handed grip for firing. Extend the firing arm, and lock the firing arm elbow and wrist to ensure solid arm control.
Figure 2-10. Kneeling position.
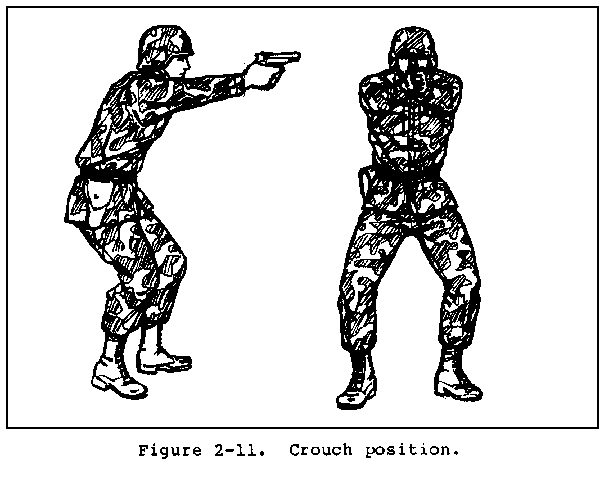
d. Crouch Position. Use the crouch position when surprise targets are engaged at close range (see Figure 2-11). Place the body in a forward crouch (boxer's stance) with the knees bent slightly and
Figure 2-11. Crouch position.
trunk bent forward from the hips to give faster recovery from recoil. Place the feet naturally in a position that allows another step toward the target. Extend the weapon straight toward the target, and lock the wrist and elbow of the firing arm. It is important to consistently train with this position, since the body will automatically crouch under conditions of stress such as combat. It is also a faster position from which to change direction of fire.
e. Prone Position. Lie flat on the ground, facing the target (see Figure 2-12). Extend arms in front with the firing arm locked. The arms may have to be slightly unlocked for firing at high targets. Rest the butt of the weapon on the ground for single, well-aimed shots. Wrap the nonfiring hand (fingers) around the fingers of the firing hand. Face forward. Keep the head down between arms as much as possible and behind the weapon.
Figure 2-12. Prone position.
f. Standing Position With Support. Use available cover for support--for example, a tree or wall to stand behind (see Figure 2-13). Stand behind a barricade with the firing side on line with the edge of the barricade. Place the knuckles of the the nonfiring fist at eye level against the edge of the barricade. Lock the elbow and wrist of the firing arm. Move the foot on the nonfiring side forward until the toe of the boot touches the bottom of the barricade.
Figure 2-13. Standing position with support.
g. Kneeling Supported Position. Use available cover for support--for example, use a low wall, rocks, or vehicle (see Figure 2-14). Place the firing-side knee on the ground. Bend the other knee and place the foot (nonfiring side) flat on
Figure 2-14. Kneeling supported.
the ground, pointing toward the target. Extend arms alongside and brace them against available cover. Lock the wrist and elbow of the firing arm. Place the nonfiring hand around the fist to support the firing arm. Rest the nonfiring arm just above the elbow on the nonfiring-side knee.
After a soldier becomes proficient in the fundamentals of marksmanship, he progresses to advanced techniques of combat marksmanship. The main use of the pistol or revolver is to engage the enemy at close range with quick, accurate fire. In shooting encounters, it is not the first round fired that wins the engagement, but the first accurately fired round. The soldier should use his sights when engaging the enemy, the only exception being if this would place the weapon within arm's reach of the enemy.
2-9. TECHNIQUES OF FIRING
a. Hand-and-Eye Coordination.
(1) Hand-and-eye coordination is not a natural, instinctive ability for all soldiers. It is usually a learned skill obtained by practicing the use of a flash sight picture (see paragraph b below). The more a soldier practices raising the weapon to eye level and obtaining a flash sight picture, the more natural the relationship between soldier, sights, and target becomes. Eventually, proficiency elevates to a point so that the soldier can accurately engage targets in the dark. Each soldier must be aware of this trait and learn how to best use it. Poorly coordinated soldiers can achieve proficiency by being closely supervised. Everyone has the ability to point at an object. Since pointing the forefinger at an object and extending the weapon toward a target are much the same, the combination of the two are natural. Making the soldier aware of this ability and teaching him how to apply it when firing results in success when engaging enemy targets in combat.
(2) The eyes focus instinctively on the center of any object observed. After the object is sighted, the firer aligns his sights on the center of mass, focuses on the front sight, and applies proper trigger squeeze. Most crippling or killing hits result from maintaining the focus on the center of mass. The eyes must remain fixed on some part of the target throughout firing.
(3) When a soldier points, he instinctively points at the feature on the object on which his eyes are focused. An impulse from the brain causes the arm and hand to stop when the finger reaches the proper position. When the eyes are shifted to a new object or feature, the finger, hand, and arm also shift to this point. It is this inherent trait that can be used by the soldier to rapidly and accurately engage targets. This instinct is called hand-and-eye coordination.
b. Flash Sight Picture. Usually when engaging an enemy at pistol/revolver ranges, the firer has little time to ensure a correct sight picture. The quick-kill (or natural point of aim) method does not always ensure a first-round hit. A compromise between a correct sight picture and the quick-kill method is known as a flash sight picture. As the soldier raises the weapon to eye level, his point of focus switches from the enemy to the front sight, ensuring that the front and rear sights are in proper alignment left and right, but not necessarily up and down. Pressure is applied to the trigger as the front sight is being acquired, and the hammer falls as the flash sight picture is confirmed. Initially, this method should be practiced slowly, gaining speed as proficiency increases.
c. Quick-Fire Point Shooting. This is for engaging an enemy at less than 5 yards. It is also useful for night firing. The weapon should be held in a two-hand grip. It is brought up close to the body until it reaches chin level and is then thrust forward until both arms are straight. The-arms and body form a triangle, which can be aimed as a unit. In thrusting the weapon forward, the firer can imagine that there is a box between him and the enemy, and he is thrusting the weapon into the box. The trigger is smoothly squeezed to the rear as the elbows straighten out.
d. Quick-Fire Sighting. This is used when engaging an enemy at 5 to 10 yards away. It is used only when there is no time available to get a full picture. The firing position is the same as for quick-fire point shooting. The sights are aligned left and right to save time, but not up and down. The firer must determine in practice what the sight picture will look like and where the front sight must be aimed to hit the enemy in the chest.
2-10. TARGET ENGAGEMENT
In close combat, there is seldom time to precisely apply all of the fundamentals of marksmanship. When a soldier fires a round at the enemy, many times he will not know if he hit his target. Therefore, two rounds should be fired at the target. This is called a double tap. If the enemy continues to attack, two more shots should be placed in the pelvic area to break the body's support structure, causing the enemy to fall.
2-11. TRAVERSING
a. Traversing 360�. In close combat, the enemy may be attacking from all sides. The soldier may not have time to constantly change his position to adapt to new situations. The purpose of the crouching or kneeling traverse 360� is to fire in any direction without moving the feet. The firer remains in the crouch position with feet almost parallel to each other. The following instructions are for a right-handed firer. The two-hand grip is used at all times except for over the right shoulder. Turning will be natural on the balls of the feet.
(1) Over the left shoulder (see Figure 2-15): The upper body is turned to the left, the weapon points to the left rear with the elbows of both arms bent. The left elbow will naturally be bent more than the right elbow.
(2) Traversing to the left (see Figure 2-16): The upper body turns to the right, and the right firing arm straightens out. The left arm will be slightly bent.
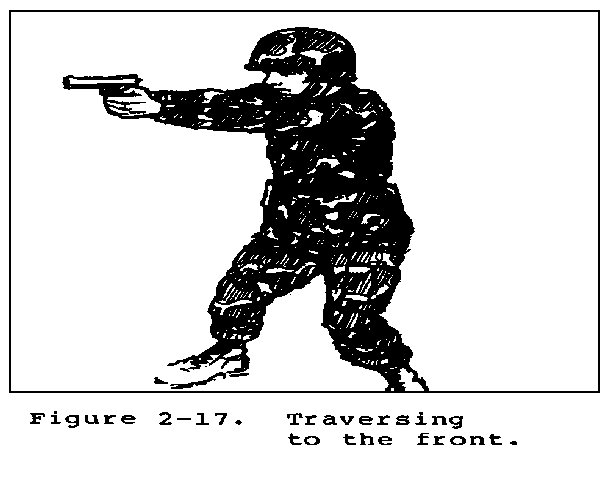
(3) Traversing to the front (see Figure 2-17): The upper body turns to the front as the left arm straightens out. Both arms will be straight forward.
(4) Traversing to the right (see Figure 2-18): The upper body will turn to the right as both elbows bend. The right elbow will naturally bend more than the left.
Figure 2-15. Traversing Figure 2-16. Traversing over the left to the left. shoulder.
Figure 2-17. Traversing Figure 2-18. Traversing to the front. to the right.
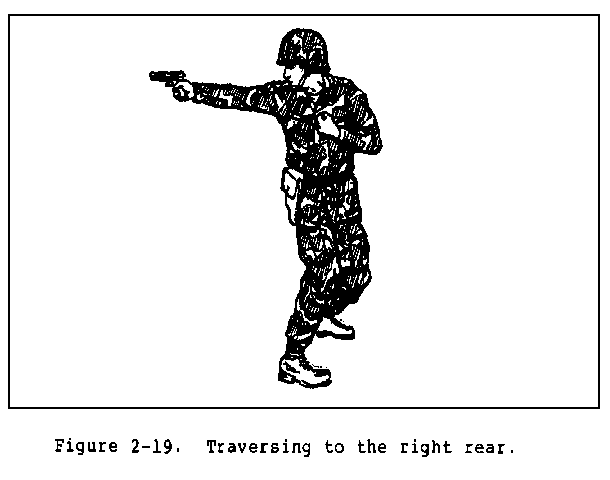
(5) Traversing to the right rear (see Figure 2-19): The upper body continues to turn to the right until it reaches a point that it cannot go further comfortably. Eventually the left hand will have to release itself from the fist grip and the firer will be shooting to the right rear with the right hand.
Figure 2-19. Traversing to the right rear.
b. Kneeling 360� Traverse. The following instructions are for right-handed firers. The hands are in a two-hand grip at all times. The unsupported kneeling position is used. The rear foot must be positioned to the left of the front foot.
(1) Traversing to the left side (see Figure 2-20): The upper body turns to a comfortable position toward the left. The weapon is aimed to the left. Both elbows are bent with the left elbow naturally bent more than the right elbow.
(2) Traversing to the front (see Figure 2-21): The upper body is turned to the front, and a standard unsupported kneeling position is assumed. The right firing arm is straight, and the left elbow is slightly bent.
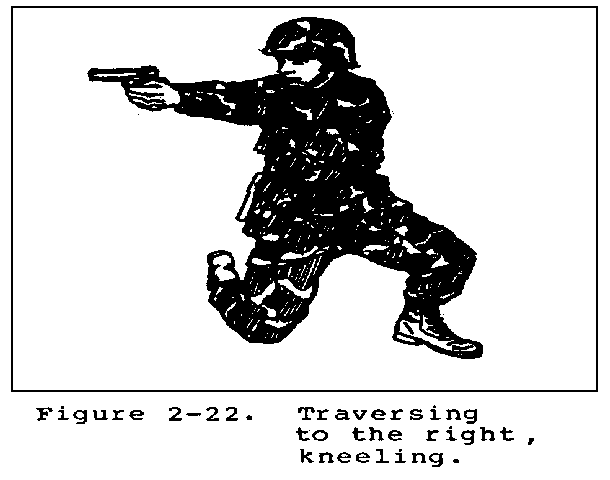
(3) Traversing to the right side (see Figure 2-22): The upper body turns to the right as both arms straighten out.
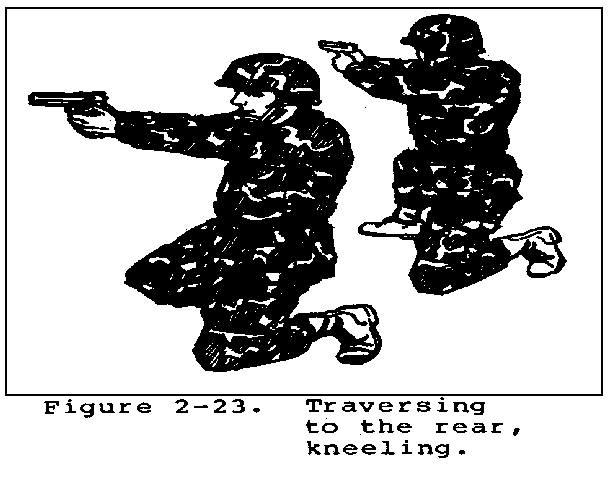
(4) Traversing to the rear (see Figure 2-23): The upper body continues to turn to the right as the left knee is turned to the right and placed on the ground. The right knee is lifted off the ground and becomes the forward knee. The right arm is straight, while the left arm is bent. The direction of the kneeling position has been reversed.
Figure 2-20. Traversing Figure 2-21. Traversing to the left, to the front, kneeling. kneeling.
Figure 2-22. Traversing Figure 2-23. Traversing to the right, to the rear, kneeling. kneeling.
(5) Traversing to the new right side (see Figure 2-24): The upper body continues to the right. Both elbows are straight until it reaches a point that it cannot comfortably to further. Eventually, the left hand must be released from the fist grip, and the firer will be firing to the right with the one-hand grip.
Figure 2-24. Traversing to the new right side, kneeling.
c. Training Method. This method can be taught anywhere without a weapon by the firer simulating a two-hand grip. The firer should be familiar with firing in all five directions.
2-12. COMBAT RELOADING TECHNIQUES
Reloading was an overlooked problem for many years until it was discovered that soldiers were being killed due to dropping of magazines, shaking hands, placing magazines in backward, and placing empty magazines back into the weapon. The stress state induced by a life-threatening situation causes soldiers to do things they would not otherwise do. Consistent, repeated training is needed to avoid such mistakes.
NOTE: These procedures should only be used in combat, not on firing ranges.
a. Rapid Reloading.
b. Tactical Reloading.
c. One-Hand Reloading.
(1) With the right hand.
NOTE: If placing the weapon in the holster backwards is a problem, place the weapon between the calf and thigh to hold the weapon.
(2) With the left hand.
NOTE: If placing the weapon in the holster backwards is a problem, place the weapon between the calf and thigh to hold the weapon.
2-13. POOR VISIBILITY FIRING
Poor visibility firing with any weapon is difficult since shadows can be misleading to the soldier. This is mainly true during EENT and EMNT (a half hour before dark and a half hour before dawn). Even though the weapon is a short-range weapon, the hours of darkness and poor visibility further decrease its effect. To compensate, the soldier must use the three principles of night vision.
a. Dark Adaptation. This process conditions the eyes to see during poor visibility conditions. The eyes usually need about 30 minutes to become 98- percent dark adapted in a totally darkened area.
b. Off-Center Vision. When looking at an object in daylight, a person looks directly at it. However, at night he would see the object only for a few seconds. To see an object in darkness, he must concentrate on it while looking 6� to 10� away from it.
c. Scanning. This is the short, abrupt, irregular movement of the firer's eyes around an object or area every 4 to 10 seconds. When artificial illumination is used, the firer uses night fire techniques to engage targets, since targets seem to shift without moving.
NOTE: For more detailed information on the three principles of night vision, see FM 21-75.
2-14. NUCLEAR, BIOLOGICAL, CHEMICAL FIRING
When firing under NBC conditions with a pistol or revolver, the firer should use optical inserts, if applicable. Firing in MOPP1 through MOPP3 levels should not be a problem for the firer. Unlike wearing a protective mask while firing a rifle, the firer's sight picture will be acquired the same as with or without a protective mask. MOPP4 is the only level that may present a problem for a firer since gloves are worn. Gloves may require the firer to adjust his grip to attain a proper grip and proper trigger squeeze. Firers should practice firing in MOPP4 to become proficient in NBC firing.
2-15. COACHING
a. Throughout preparatory marksmanship training, the coach-and-pupil method of training should be used. The proficiency of a pupil depends on how well his coach performs his duties. The coach assists the firer by correcting errors, ensuring he takes proper firing positions, and ensuring he observes all safety precautions. The criteria for selecting coaches are a command responsibility; coaches must have experience in pistol marksmanship above that of the student firer.
b. Duties of the coach during instruction practice and record firing include:
(1) Checking that the--
(a) Weapon is cleared.
(b) Ammunition is clean.
(c) Magazines are clean and operational.
(2) Observing the firer to see that he--
(a) Takes the correct firing position.
(b) Loads the weapon properly and only on command.
(c) Takes up the trigger slack correctly.
(d) Squeezes the trigger correctly (see paragraph 2-7)
(e) Calls the shot each time he fires (except for quick fire and rapid fire).
(f) Holds his breath correctly (see paragraph 2-5).
(g) Lowers his weapon and rests his arm when he does not fire a round within five to six seconds.
(3) Having the firer breathe deeply several times to relax if he is tense.
2-16. BALL-AND-DUMMY METHOD
In this method the coach loads the weapon for the firer. He may hand the firer a loaded weapon or an empty one. When firing the empty weapon, the firer observes that in anticipating recoil he is forcing the weapon downward as the hammer falls. Repetition of the ball-and-dummy method helps to alleviate recoil anticipation.
2-17. CALLING THE SHOT
To call the shot is to state where the bullet should strike the target according to the sight picture at the instant the weapon fires--for example: "high," "a little low," "to the left," "to the right," or "bull's-eye." If the firer does not call his shot correctly in range firing, he is not concentrating on sight alignment. Consequently, he does not know what his sight picture is as he fires. Another method of calling the shot is the clock system--for example. a three-ring hit at 8 o'clock, a four-ring hit at 3 o'clock. Another method is to provide the firer with a target center (placed beside him on the firing line). As soon as the shot is fired, the firer must place a finger on the target face or center where he expected the round to hit on the target. This method avoids guessing and computing for the firer. The immediate placing of the finger on the target face gives an accurate call. If the firer does not call his shot correctly, he is not concentrating on sight alignment and trigger squeeze. Thus, he does not know that his sight picture is as the weapon fires.
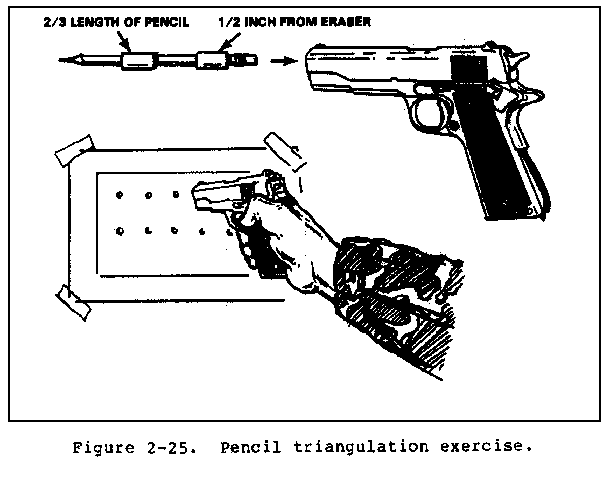
2-18. PENCIL TRIANGULATION EXERCISE
The pencil triangulation exercise (see Figure 2-25) is conducted only with an unloaded and properly cleared M1911A1 caliber .45 pistol. It will not work with an M9 pistol; however, coaches may have students dry fire the M9 while he observes the firers to see if the front sight dips or jumps when the hammer falls. The pencil triangulation exercise consists of firing a pencil or pointed dowel point-blank at a miniature target. It combines position, grip, sight alignment, breathing, and trigger squeeze into a single practical work exercise. At the same time, it measures the firer's performance without the effects of recoil. This practical work is designed to teach and develop correct shooting habits. It can be conducted indoors or out, which makes an ideal exercise where range facilities are limited or when weather is poor.
Figure 2-25. Pencil triangulation exercise.
a. Equipment.
(1) One dowel or lead pencil for every two students. This pencil should be at least 6 inches long and wrapped with masking or cellophane tape. The tape wrappings form two bushings that fit the inside diameter of the weapon's barrel.
(2) One miniature bull's-eye sheet for every two students. The bull's-eye sheet can be copied, drawn, or stamped by using the eraser of a pencil and ink pad. The bull's-eyes should not be larger than 1/8 inch and at least 1 inch apart.
b. Conduct of the Exercise. The instructor explains and demonstrates the details of the exercise before practical work by the students. The firer should begin by using a two-hand grip, progressing to the one-hand grip as his skills increase.
(1) The firer faces the target and takes up a good shooting position. This position is close enough to the miniature bull's-eye so when the pencil is inserted into the barrel, with the firer's arm extended and the sights aimed at the miniature bull's-eye, the point of the pencil is within l inch of the target. The bull's-eye sheet should be affixed to a target, or any type support, and should be shoulder-high to the firer.
(2) The firer inserts the pencil into the muzzle of the barrel, eraser end first, and cocks the hammer. He grips the weapon properly, extends the shooting arm, aims the weapon at the miniature bull's-eye, squeezes the trigger, and the hammer falls. The hammer strikes the firing pin, which in turn strikes the rubber eraser of the pencil, driving it out of the barrel and causing it to make a pencil dot l/2 inch below the bull's-eye (if the firer had the correct sight alignment and trigger squeeze).
(3) The firer continues this exercise until he has fired a group of five pencil marks below each target. The object of the exercise is to keep the five pencil marks in a group as small as the 1/8-inch bull's-eye, 1/2 inch directly below the bull's-eye. With practice, many firers can hit the same mark with the pencil. This indicates that the firer is properly performing the fundamentals of marksmanship each time.
2-19. SLOW-FIRE EXERCISE
a. This is a dry-fire exercise. The slow-fire exercise is one of the most important exercises for both amateur and competitive marksmen. Coaches should ensure soldiers practice this exercise as much as possible. To perform the slow-fire exercise, the firer assumes the standing position with the weapon pointed at the target. The firer should begin by using a two-hand grip, progressing to the one-hand grip as his skill increases. He takes in a normal breath and lets part of it out, locking the remainder in his lungs by closing his throat. He then relaxes, aims at the target, takes the correct sight alignment and sight picture, takes up the trigger slack, and squeezes the trigger straight to the rear with steady, increasing pressure until the hammer falls, simulating firing.
b. If the firer does not cause the hammer to fall in 5 or 6 seconds, he should come to the pistol ready position, and rest his arm and hand. He then starts the procedure again. The action sequence that makes up this process can be summed up by the key word BRASS. It is a word the firer should think of each time he fires his weapon:
Breathe--Take a normal breath, let part of it out, and lock the remainder in the lungs by closing the throat.
Relax--Relax the body muscles.
Aim--Take correct sight alignment and sight picture, and focus the eye at the top of the front sight.
Slack--Take up the trigger slack.
Squeeze--Squeeze the trigger straight to the rear with steadily increasing pressure without disturbing sight alignment until the hammer falls.
c. Coaches should observe the front sight for erratic movements during the application of trigger squeeze. Proper application of trigger squeeze allows the hammer to fall without the front sight moving. A small bouncing movement of the front sight is acceptable. Firer's should call the shot by the direction of movement of the front sight (high, low, left, or right).
2-20. AIR-OPERATED PISTOL, .177 MM
The air-operated pistol is used as a training device to teach the soldier the method of quick fire, to increase confidence in his ability, and to afford him more practice firing. A range can be set up almost anywhere with a minimum of effort and coordination, which is ideal for USAR and NG. If conducted on a standard range, live firing of pistols and revolvers can be conducted along with the firing of the .177-mm air-operated pistol. Due to light recoil and little noise of the pistol, the soldier can concentrate on fundamentals. This helps build confidence, because the soldier can hit a target faster and accurately. The air-operated pistol should receive the same respect as any firearm. A thorough explanation of the weapon and a safety briefing are given to each soldier.
2-21. QUICK-FIRE TARGET TRAINING DEVICE
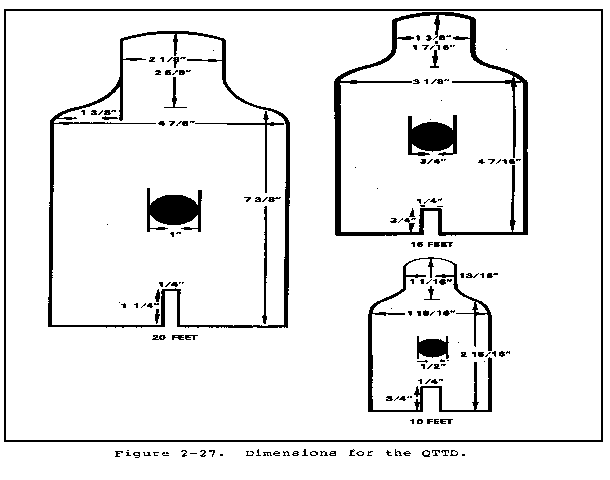
The QTTD (see Figures 2-26 and 2-27) is used with the .177-mm air-operated pistol. Figure 2-26. The quick-fire target training device.
PHASE I. From 10 feet, five shots at a 20-foot miniature E-type silhouette. After firing each shot, the firer and coach discuss the results and make corrections.
PHASE II. From 15 feet, five shots at a 20-foot miniature E-type silhouette. The same instructions apply to this exercise as for PHASE I.
Figure 2-27. Dimensions for the QTTD.
PHASE III. From 20 feet, five shots at a 20-foot miniature E-type silhouette. The same instructions apply to this exercise as for PHASES I and II.
PHASE IV. From 15 feet, six shots, at two 20-foot miniature E-type silhouettes.
(1) This exercise is conducted the same as the previous one, except that the firer is introduced to fire distribution. The targets on the QTTD are held in the up position so they cannot be knocked down when hit.
(2) The firer first engages the 20-foot miniature E-type silhouette on the extreme right of the QTTD (see Figure 2-28). He then traverses between targets and engages the same type target on the extreme left of the QTTD. The firer again shifts back to reengage the first target. The procedure is used to teach the firer to instinctively return to the first target if he misses it with his first shot.
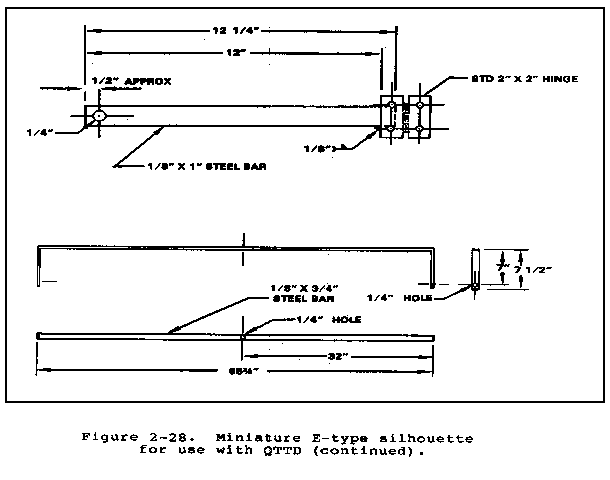
Figure 2-28. Miniature E-type silhouette for use with QTTD.
Figure 2-28. Miniature E-type silhouette for use with QTTD (continued).
Figure 2-28. Miniature E-type silhouette for use with QTTD (continued).
(3) The firer performs this exercise twice, firing three shots each time. Before firing the second time, the coach and firer should discuss the errors made during the first exercise.
PHASE V. Seven shots fired from 20, 15, and 10 feet at miniature E-type silhouettes.
(1) The firer starts this exercise 30 feet from the QTTD. The command, MOVE OUT, is given, and the firer steps out at a normal pace with the weapon held in the ready position. Upon the command, FIRE (given at the 20-foot line), the firer assumes the crouch position and engages the 20-foot miniature E-type silhouette on the extreme right of the QTTD. He then traverses between targets, engages the same type target on the extreme left of the QTTD, and shifts back to the first target. If the target is still up, he engages it. The firer then assumes the standing position and returns the weapon to the ready position. Upon completion of each exercise, the coach makes corrections as the firer returns to the standing position.
(2) On the command, MOVE OUT, the firer again steps off at a normal pace. Upon the command, FIRE (given at the 15-foot line), he engages the 15-foot targets on the QTTD. The same sequence of fire distribution is followed as with the previous exercise.
(3) During this exercise, the firer moves forward on command, until he reaches the 10-foot line. At the command, FIRE, the firer engages the 10-foot miniature E-type silhouette in the center of the QTTD.
2-22. RANGE FIRING COURSES
Range firing is conducted after the firers have satisfactorily completed preparatory marksmanship training. The range firing courses are:
a. Instructional firing is practice firing on a range, using the assistance of a coach.
(1) All personnel authorized or required to fire the pistol or revolver receive 12 hours of preliminary instruction that includes the following:
(2) The tables fired for instructional practice are prescribed in the combat pistol qualification course in Appendix A and in the revolver qualification course in Appendix C. During the instructional firing, the CPQC or RQC is fired with a coach or instructor.
NOTE: The RQC is fired on the same range as the CPQC; for a picture of the CPQC see FM 25-7.
b. The CPQC stresses the fundamentals of quick fire. It is the final test of a soldier's proficiency and the basis for his marksmanship classification. After the soldier has completed the instructional practice firing he will shoot the CPQC for record. A detailed description of the CPQC tables, standards, and conduct of fire is in Appendix A.
NOTE: The alternate pistol qualification course (APQC) or alternate revolver qualification course (ARQC) can be used for sustainment/ qualification if the CPQC is not available (see Appendix B and Appendix D).
c. The military police firearms qualification course is a practical course of instruction for police firearms training (see FM 19-10).
Safety must be observed during all marksmanship training. Listed below are the precautions for each phase of training. It is not intended to replace AR 385-63 or local range regulations. Range safety requirements vary according to the requirements of the course of fire. It is mandatory that the latest range safety directives and local range regulations be consulted to determine current safety requirements.
2-23. REQUIREMENTS
a. A red flag is displayed prominently on the range during all firing.
b. Weapons must be handled carefully and are never pointed at anyone except the enemy in actual combat.
c. A weapon is always assumed loaded until it has been thoroughly examined and found to contain no ammunition.
d. Firing limits are indicated by red-and-white-striped poles visible to all firers.
e. Obstructions should never be placed in the muzzle of any weapon about to be fired.
f. Weapons are kept in a prescribed area with proper safeguards.
g. Smoking is not allowed on the range near ammunition, explosives, or flammables.
2-24. BEFORE FIRING
a. All prescribed roadblocks and barriers are closed, and guards are posted.
b. All weapons are checked to ensure they are clear of ammunition and obstructions, and slides are locked to the rear.
c. All firers are briefed on the firing limits of the range and firing lanes. They must keep their fires within prescribed limits.
d. All firers are instructed on how to load and unload the weapon, and on safety features.
e. All personnel are briefed on all safety aspects of fire and range pertaining to the conduct of the courses
f. No one moves forward of the firing line without permission of the tower operator, safety officer, or OIC.
g. Weapons are loaded and unlocked only on command from the tower operator except during the conduct of the courses requiring automatic magazine changes.
h. Weapons are not handled except on command from the tower operator.
i. Firers must keep their weapons pointed downrange when loading, preparing to fire, or firing.
2-25. DURING FIRING
a. A firer does not move from his position until his weapon has been cleared by safety personnel, and it has been placed in its proper safety position. An exception is the assault phase.
b. During Table 5 of the CPQC, firers remain on line with other firers on their right or left.
c. Firers are careful to fire in their own firing lane and not to point the weapon into an adjacent lane, mainly during the assault phase.
d. The air-operated pistol is treated as a loaded weapon. Firers observe the same safety precautions as with other weapons.
e. All personnel wear helmets during live-fire exercises.
f. The weapon is held in the raised position except when preparing to fire. It is then held in the ready position, pointed downrange.
2-26. AFTER FIRING
a. Safety personnel inspect all weapons to ensure they are clear. A check is conducted to determine if any brass or live ammunition is in possession of soldiers.
b. Once cleared, pistols are secured with the slides locked to the rear, and revolvers with cylinders open.
2-27. INSTRUCTIONAL PRACTICE AND RECORD QUALIFICATION FIRING
During these phases of firing, safety personnel ensure that the--
a. Firer understands the conduct of the exercise.
b. Firer has the required ammunition, and understands the commands for loading and unloading.
c. Firer complies with all commands from the tower operator.
d. Proper alignment is maintained with other firers while moving downrange.
e. Weapon is always pointed downrange.
f. Firer fires within the prescribed range limits.
g. Weapon is cleared after each phase of firing, and the tower-operator is aware of the clearance.
h. Malfunction or failure to fire, due to no fault of the firer, is reported immediately. On command of the tower operator, the weapon is cleared and action is taken to allow the firer to continue with the exercise.
NOTE: For training and qualification standards see Appendixes A through E.