
This chapter discusses the malfunctions, stoppages, immediate actions, remedial actions, and destruction procedures of the MG. All corrective actions must comply with safety procedures.
A malfunction is any failure of the gun to function satisfactorily. Examples of malfunctions are:
a. Failure to Function Freely. Sluggish operation is usually due to human failure to eliminate excessive friction caused by dirt, lack of proper lubrication, burred parts, incorrect headspace adjustment, or incorrect timing.
b. Uncontrolled Automatic Fire. Uncontrolled automatic fire (runaway gun) is when fire continues even when the trigger or trigger control mechanism is released. If the cause is present before the gun is fired, the gun will start to fire when the recoiling groups move into battery the second time. If the defect occurs during firing, the gun will continue firing when the trigger control mechanism is released. A runaway gun may be caused--
To stop the uncontrolled automatic fire:
(1) Keep the gun laid on target.
(2) Twist the belt, causing the gun to jam.
(3) Caution, do not unlatch the cover.
(4) Wait 5 minutes to guard against cook off.
(5) Clear weapon, replace broken, worn, or burred parts. Check the sideplate trigger and trigger control mechanism, when applicable.
A stoppage is any interruption in the cycle of operation caused by the faulty action of the gun or ammunition. Stoppages are classified as follows:
a. Failure to Feed. Prevents the round from being properly positioned in the receiver group.
b. Failure to Chamber. Prevents the complete chambering of the round.
c. Failure to Lock. Prevents the breech lock from correctly entering its recess in the bolt.
d. Failure to Fire. Prevents the ignition of the round.
e. Failure to Unlock. Prevents the breech lock from moving out of its recess in the bolt.
f. Failure to Extract. Prevents the extraction of the expended cartridge from the chamber.
g. Failure to Eject. Prevents the ejection of the expended cartridge from the receiver.
h. Failure to Cock. Prevents the firing pin extension from being engaged with the sear.
Table 4-1 lists the causes of most stoppages.
The first thing to do when a stoppage occurs is to apply immediate action, which is the prompt action taken by the firer to reduce a stoppage. Immediate action is performed by the gunner; however, every crewmember must be trained to apply immediate action. The following procedures will assist in reducing most stoppages without analyzing their cause in detail.
|
WARNING Failure to follow procedures may result in damage to weapon and
|
a. If gun fails to fire, take the following action:
(1) Wait 5 seconds; a hangfire may be causing the misfire. In the next 5 seconds, pull the bolt to the rear (check for ejection and feeding of belt), release it, re-lay on the target, and attempt to fire. If the bolt-latch release and trigger are depressed at the same time, the bolt goes forward and the weapon should fire automatically.
(2) If the gun again fails to fire, wait 5 seconds, pull the bolt to the rear (engage with bolt latch if applicable), and return the retracting slide handle to its forward position. Open the cover and remove the belted ammunition. Inspect the gun to determine the cause of stoppage.
b. A hangfire or cookoff can cause injury to personnel or damage to the weapon. To avoid these, the gunner must take the following precautions:
(1) Always keep the round locked in the chamber the first 5 seconds after a misfire occurs. This prevents an explosion outside of the gun in event of a hangfire.
(2) If the barrel is hot, the round must be extracted within the next 5 seconds to prevent a cookoff. When more than 150 rounds have been fired in a 2-minute period, the barrel is hot enough to produce a cookoff.
(3) If the barrel is hot and the round cannot be extracted within the 10 seconds, it must remain locked in the chamber for at least 5 minutes, to guard against a cookoff.
(4) Keep the gun cover closed during the waiting periods.
When immediate action does not correct the malfunction, the quickest way to resume firing is to replace the defective part.
a. Removal of a Cartridge from the T-Slot. If the cartridge does not fall out, hold the bolt to the rear, and with the extractor raised, use a screwdriver to push the cartridge out the bottom of the receiver.
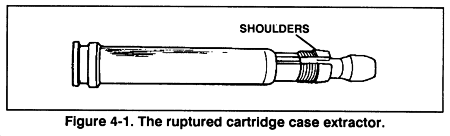
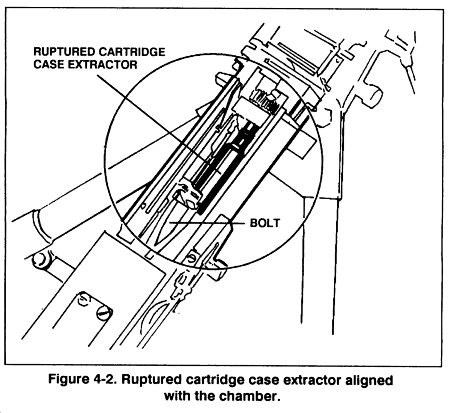
b. Removal of a Ruptured Cartridge. A ruptured (separated) cartridge case may be removed with a cleaning rod or ruptured cartridge extractor. When using the ruptured cartridge extractor, raise the cover and pull the bolt to the rear. Place the extractor in the T-slot of the bolt in the same manners as that of a cartridge, so that it is held in line with the bore by the ejector of the extractor assembly of the gun. With the extractor aligned with the bore and held firmly in the T-slot, let the bolt go forward into the ruptured case, and the shoulders will spring out in front of the case. Pull the bolt to the rear and remove the ruptured case and extractor (Figures 4-1 and 4-2).
The decision to destroy the gun to prevent its capture and use by the enemy is a command decision. It will be ordered and carried out only on authority delegated by the major unit commander.
The following methods may be used to destroy specific components of the MG.
a. Gun. Field strip the gun. Use the barrel as a sledge. Raise the cover and smash the cover forward and down toward the barrel support. Smash the backplate group. Remove the firing pin from the bolt; place the striker in the hole in the face of the bolt and bend it until broken. Remove the barrel buffer tube lock assembly from the barrel buffer body group and bend and deform it. Smash and bend the breech lock depressors. Place the barrel extension in the rear of the receiver with the barrel extension shank protruding; knock off the shank by striking it with the barrel from the side. Deform and crack the receiver by striking it with the barrel at the sideplate corners nearest the feedway. Smash the extractor.
b. Tripod Mount, M3. Leave the pintle on the tripod by removing the pintle bolt from the gun. Use the barrel as a sledge. Strike the sides of the pintle and deform it. Fold the trail legs and turn the mount over. Stand on the folded trail legs and knock off the pintle latch (pintle lock release cam). Smash the elevating mechanism with the barrel. If possible, smash the rear legs to prevent unfolding.
c. Antiaircraft Mount, M63. Remove the sideplate trigger control mechanism from its container or the gun, and deform it by using the barrel. Lock the cradle and yoke assembly in the horizontal position and beat the trigger frame assembly and cradle until they are bent down along the elevator assembly. Strike the elevator from the side with the barrel until it is bent so that the elevator will not rotate in the base.
d. Spare Parts. Destroy the bolt, barrel extension, firing pins, and barrel buffer groups. Break or deform all other parts.
e. Ammunition. When time permits and material is available, destroy ammunition by burning. Unpack all ammunition from boxes or cartons, stack the ammunition in a heap and, using flammable material available, ignite and take cover immediately.
f. Burning. To destroy the gun by burning, place a thermite grenade in the receiver on the bolt (with the cover resting on the grenade) and fire the grenade. (This method may require the use of more than one grenade.) Remove the backplate group, place a thermite grenade in the rear of the receiver and fire the grenade.
g. Disposal. Bury in suitable holes, or dump parts into streams, mud, snow, sumps, latrines, or scatter the parts over a wide area.